Powder Monkey Mittens
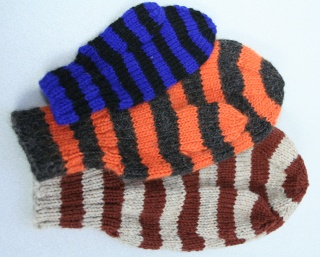 These fine striped mittens were knit for the wee cabin boy's sixth birthday. He specifically requested striped mittens the left one red and black and the right one blue and black. And when asked to confirm his selection a few days later he even held to which hand was which. The pattern however is completely hand independent, despite having the thumb in the palm rather than on the side. I actually knit him 3 mittens in case he lost one over the side in a storm.They were so popular I've figured out three more sizes. One for every size of pirate.
Supplies:
Worsted weight wool. Two colors. 20-25g each color for kids mittens 40-50g each color for adult sizes.
size 4 and 6 needles probably dpns unless you're one of those two circular needle fans.
Gauge: 8 rows and 6 sts / inch
Sizes: kids 4-7, kids 8-12, Adult S, Adult L
Specialized Techniques:
The whole mitten is knit in alternating 4(5,6,6)round stripes of color. Since you're only going up four rows you can just float the yarn straight up rather than weaving in about a billion ends.
Ribbed Cuff:
Arrange stitches on 3 either 6(6,9,9) sts 12(18,18,24) sts 6(6,9,9) sts
Begin ribbing cuff in k2p1 rib
If desired use no-bump color change to change colors in the ribbing section. Othewise rib normally.
Rib 4(5,6,6) rows MC
Rib 4(5,6,6) rows CC
Rib 4(5,6,6) rows MC
Rib 4(5,6,6) rows CC
next row increase evenly to 32(40,48,56)sts (k3, m1) (distribute on your needles as 8(10,12,14) 16(20,24,28) 8(10,12,14))
knit 2(3,4,4) more rows even. You will now have 4(5,6,6) rows of your MC.
Switch to CC and knit 4(5,6,6) rows.
Switch to MC and knit 4(5,6,6) rows. (you will now have 3 stripes beyond your ribbing)
Switch to waste yarn and knit 5(5,7,8) stitches.
Switch to CC and knit the first 5(5,7,8) stitches again, and continue to finish the round.
Knit 3(4,5,5) more rows CC.
Knit 4(4,3,4) more stripes alternating MC and CC.
Round 2: k around
Round 3 k5 k2tog 24(30,36,42)sts
Round 4: k around
Round 5: k4 k2tog 20(25,30,35)sts
Round 6: k around
Round 7: k3 k2tog 16(20,24,28)sts
Round 8: k around
Round 9: k2 k2tog 12(15,18,21)sts
Round 10: k around
Round 11: k1 k2 tog 8(10,12,14)sts
Round 12: k around
Break off yarn leaving a 12" tail
With yarn needle thread the tail through remaining 8(10,12,14) sts twice and tighten carefully down. bring working end inside and weave ends to secure mitten top.
Carefully remove the waste yarn. I like to pick out the end stitches, just to make sure I didn't miss picking up a stitch. You can cut the middle stitches and pick out all the little bits if you think that's faster.
Arrange your stitches on 3 needles picking and twist onto your needles up a couple out of the loose loops in the corners. I usually end up with somewhere around 3-4 more stitches than were on the waste yarn. Too many more and your thumb is too big, to few and you end up with a hole in the corner.
Join CC. (or whichever color the stripe above the thumb is) I personally do this by dropping the tail down through the mitten and out the cuff and then cleating it around a spare needle run through the cuff. This lets me get pretty OK tension on the first stitch and is easy to undo when we get to weaving the ends.
Knit 16 (18,20,22) rounds in stripe pattern
Cut off CC with tail long enough to weave and drop/stuff it down the thumb)
Knit 1 row in MC
in MC k2tog all the way around the thumb
Knit 1 row in MC
in MC k2tog all the way around the thumb
Knit 1 row in MC
Cut off a longish tail about a foot or so.
Thread the the tail on a yarn needle through the remaining stitches twice and pull tight (tighten the inside first loop first then the second, don't ask me how many times it took me to learn that one)
Feed the yarn back inside the thumb.
Undo cleated ends (if you bothered)
Repeat the whole process again for your second mitten. You do NOT have to reverse the thumb direction because the top of the mitten is round so the mittens are reversible.
To put your seams on the underside of both mittens, knit the thumb on the last needle instead of the first. (so it might be more important if you didn't do the joggless join) The floats felt into palms after a little wear.

Powder Monkey Mitten Pattern by Laura Thomas & Heidi Waterhouse is licensed under a Creative Commons Attribution 3.0 United States License.
